


Introduction
In the last article, we have seen how to build an RSK node in our computer, select the proper network for development, configure Truffle to connect and deploy our future contracts, add accounts to our node and obtain funds to use them to pay the gas.
You should have now your node in the selected network fully synced, and at least one account with funds configured in the truffle and RSK node config files for our deployments.
In this article, we’ll be discussing deployment and interaction of Smart-Contracts over the RSK network. Our contract will be an ERC20 Token, based on the OpenZeppelin libraries, and we will deploy it directly into the Mainnet.
Creating the Contract
The very first thing that we need to achieve is to know how to use Truffle.
When we do
$ truffle init
inside an empty folder, besides creating the configuration file, we also created folders for our projects and the migration contract to keep a record of changes over the same contract.
The .sol code files of the contracts are located in
~/Truffle/contracts
The migration scripts are in
~/Truffle/migrations
The compiled contracts are in
~/Truffle/build
And the test are in
~/Truffle/test
We’ll be working only on the first 2 folders for now.
Inside the Truffle folder, we import the libraries from OpenZeppelin with
$ npm install -E openzeppelin-solidity
These libraries will install not only the main libraries of our token but also libraries for ownership, safe math and many other facilities. It’s worth mentioning that these libraries have been reviewed to accomplish high standards of security so contracts that depend on them are less susceptible to hacking when used correctly.
Our libraries will be installed in
~/Truffle/node_modules/openzeppelin-solidity/contracts
After that, we can import a library ABCD.sol to our contract like this:
import 'zeppelin-solidity/contracts/token/ERC20/ABCD.sol';
To create our ERC20 Token, we will import 2 libraries from that repository: the StandardToken.sol, which has the main functionality of a Token and already imports a bunch of libraries more by itself such as SafeMath.sol, and Ownable.sol. These allows us to set owner control over functions in contracts.
To inherit the libraries attributes and functions, we simply define our contract as a StandardToken and as Ownable using the “is” keyword in this way:
contract CoinFabrikToken is StandardToken, Ownable { }
After that, we have all the functions from those libraries and from their imported upward libraries.
Next, we define the Token’s name as CoinFabrik, its symbol, 18 decimals for the precision of the Token (the standard in Ethereum-like networks, giving us the possibility to use Ether conversion functions of web3) and the initial supply of tokens to 1000 like this:
string public name = 'CoinFabrik';
string public symbol = 'CF';
uint8 public decimals = 18;
uint public INITIAL_SUPPLY = 1000;
We are also going to create another string, a non-public variable not relevant to the Token functionality, to show the usage of the Ownable library properties, which allows only the creator to interact with some designated functions. We’ll see that later.
With our parameters already defined, now it’s time to assign them to the Token variables through the constructor function. Up to now, the constructor function was defined as a function which had the same name as the contract, but from now on, there will be a function called “constructor()” already defined which will replace the older method. The Solidity compiler will warn you if you call the constructor like before.
The number of the INITIAL_SUPPLY times the precision of the decimals will be assigned to the totalSupply_ of the BasicToken contract with
totalSupply_ = INITIAL_SUPPLY * (10**uint(decimals));
And deposit them in the creator’s account
balances[msg.sender] = totalSupply_;
With this, we have a simple and standard Token ready to be used but, as we said, we are going to add some functionalities using the Ownable contract. First, we will define a couple of functions: one that modifies the state of our non-public variable, but only if you have owner permissions, and the other one, that returns the message of the string. The definitions are the following:
function setON(string _n) public onlyOwner returns (bool) {
    Owner = _n;
    return true;
  }

  function getON() public view returns (string) {
    return Owner;
  }
Both are public, so anyone can try to call them, but for the first one, only the owner’s address won’t cause a revert. If you are the owner and the function is called, the string is saved in our variable Owner (with capital letters) and it will also return a true value that we can check in the transaction.
Since the Owner variable isn’t public and doesn’t have a Getter, we need a function that returns the value of the variable without changing the state of the blockchain. This is the second function.
We will also create a fallback function that emits an event if someone wrongly calls our contract
function () public payable {
    if (msg.value > 0) {
      emit Yes('Thanks for donating SBTC! :)');
    } else {
      emit No('Error 404: Function not found :P');
    }
}
Finally, we add a destroyable capability to the contract in which the owner is the only one who can execute it.
Our simple Token is finished. The code all together should look like
pragma solidity ^0.4.17;

import 'zeppelin-solidity/contracts/token/ERC20/StandardToken.sol';
import "zeppelin-solidity/contracts/ownership/Ownable.sol";

contract CoinFabrikToken is StandardToken, Ownable {
  string public name = 'CoinFabrik';
  string public symbol = 'CF';
  uint8 public decimals = 18;
  uint public INITIAL_SUPPLY = 1000;

  string Owner;

  event Yes(string);
  event No(string);

  constructor() public {
    totalSupply_ = INITIAL_SUPPLY * (10**uint(decimals));
    balances[msg.sender] = totalSupply_;
  }

  function setON(string _n) public onlyOwner returns (bool) {
    Owner = _n;
    return true;
  }

  function getON() public view returns (string) {
    return Owner;
  }

  function () public payable {
    if (msg.value > 0) {
      emit Yes('Thanks for donating SBTC! :)');
    } else {
      emit No('Error 404: Function not found :P');
    }
  }

  function destroy() public onlyOwner {
    selfdestruct(owner);
  }

}
Creating the Migration
For each contract, we need to tell Truffle which contract is the one that we want to deploy and where we can find it. This is done through a migration file in the folder ~/Truffle/migrations.
The migration 02_deploy_token.js should look like
var CoinFabrikToken = artifacts.require("./CoinFabrikToken.sol");
module.exports = function(deployer) {
  deployer.deploy(CoinFabrikToken);
};
We have configured Truffle, our node is synced, our contract is already written and our migration configured; it’s deployment time.
Deployment
If we’ve stopped our node before, we will get it back online and then we will connect to it with Truffle with
$ sudo service rsk start
$ cd ~/Truffle/ && truffle console --network rsk
There, we compile our contract with
truffle(rsk)> compile --all
You shouldn’t get any errors or warnings for our contract. Then we migrate our contract with
truffle(rsk)> migrate --reset
Given that time is expensive, we can execute both commands in one line with
truffle(rsk)> migrate --all --reset
The migration contract will be deployed first. Truffle gives us the transaction hashes of each operation, so we can check for details or logs later. Here is the complete output that I’ve received
truffle(rsk)> migrate --all --reset
Compiling ./contracts/CoinFabrikToken.sol...
Compiling ./contracts/Migrations.sol...
Compiling zeppelin-solidity/contracts/math/SafeMath.sol...
Compiling zeppelin-solidity/contracts/ownership/Ownable.sol...
Compiling zeppelin-solidity/contracts/token/ERC20/BasicToken.sol...
Compiling zeppelin-solidity/contracts/token/ERC20/ERC20.sol...
Compiling zeppelin-solidity/contracts/token/ERC20/ERC20Basic.sol...
Compiling zeppelin-solidity/contracts/token/ERC20/StandardToken.sol...
Writing artifacts to ./build/contracts

Using network 'rsk'.

Running migration: 1_initial_migration.js
  Deploying Migrations...
  ... 0xf00d4ecf2b5752022384f7609fe991aa72dda00a0167a974e8c69864844ae270
  Migrations: 0x1dc2550023bc8858a7e5521292356a3d42cdcbe9
Saving successful migration to network...
  ... 0x3e759e8ff8a7b8e47a441481fa5573ccf502b83f3d591ad3047e622af0f9169e
Saving artifacts...
Running migration: 2_deploy_token.js
  Deploying CoinFabrikToken...
  ... 0x300c8bb1e434e2aa4b13dcc76087d42fcbe0cb953989ca53a336c59298716433
  CoinFabrikToken: 0xc341678c01bcffa4f7362b2fceb23fbfd33373ea
Saving successful migration to network...
  ... 0x71771f7ee5d4e251e386979122bdda8728fa519d95a054572751bb10d40eb8c5
Saving artifacts...
If we check the transactions, we can calculate the gas cost of all the deployment process. In my case, it was 2340788 gas (277462 + 42008 + 1994310 + 27008).
So changing it to real SBTC, we get 2340788 * 183000000 / 10^18 = 0,000428364 SBTC. That’s around ~4 USD at the time of writing this article.
Our contract is now deployed at
Congrats!
Interaction with the Contract
Syntax Simplification
With the address given by Truffle’s migration, and with the ABI of the contract, we create an instance of it so the syntaxis is easier for handling the functions. To do this, after we deployed it, we write
truffle(rsk)> var cfToken = web3.eth.contract(CoinFabrikToken.abi).at(CoinFabrikToken.address)
In case the contract was already deployed, and knowing its address and ABI, we can just simply do
truffle(rsk)> var cfToken = web3.eth.contract(‘Contract_ABI’).at(‘Contract_ADDRESS’)
Where Contract_ABI is the compressed in-one-line ABI and Contract_ADDRESS doesn’t need explanation.
I have created 2 accounts before, and now we rename them for convenience
truffle(rsk)> var acc0 = web3.eth.accounts[0]
truffle(rsk)> var acc1 = web3.eth.accounts[1]
acc0 is the one that deployed the contract. Acc0 was added to the truffle.js and node.conf configuration files.
Ownership Control
We will first test the ownership function of our contract using the library that we’ve discussed.
If we call the getON function from any account, given that it’s public and hasn’t any ownership issues, we get
truffle(rsk)> cfToken.getON()
''
Now, the setON function has an ownership property. Any transaction made from a different account will be dismissed. We see for instance, that trying to sign the contract with my name from acc1 will not change its value.
truffle(rsk)> cfToken.setON('Andres Bachfischer', {from: acc1})
0x5f115190b60238240bedf36d1c5bb69a443a0f8ee971b0fc40fe5ca9c727d47c
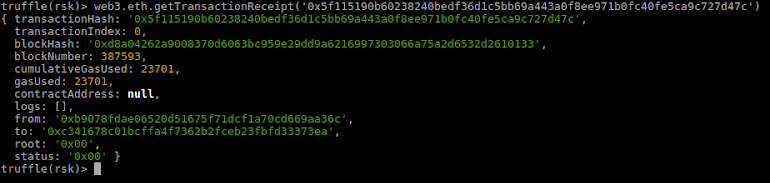
With the transaction’s hash we see that the returned value was false and the function was not executed properly. Calling the getON function again, we see that the variable didn’t change its value.
Signing now the same transaction but from the owner’s account acc0, we get a status ‘0x01’ and the function is correctly executed.
truffle(rsk)> cfToken.setON('Andres Bachfischer', {from: acc0})
0x0c894fa7e5369573fb14addeaed4cd9d5b6cd1425cb4eeeae16cb4e1fa8e0364
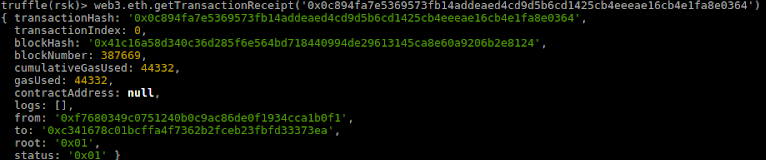
Calling again the function getON, we see that the ownership library worked as we hoped it would.
truffle(rsk)> cfToken.getON()
![]()
Ownable.sol also has a function that allows us to change the owner of the contract to another address. We’ll not use it. Nevertheless, its usage is the following
truffle(rsk)> cfToken.transferOwnership(acc1, {from: acc0})
With that, acc1 would be the new owner of the contract.
Let’s move on to the Token.
Token operations
The first thing we do is to check if the balances of the Token were correctly assigned in the creation of the contract.
We check our balances on each account like this:
web3.fromWei(cfToken.balanceOf(acc0).toString(10)) // = ‘1000’
web3.fromWei(cfToken.balanceOf(acc1).toString(10)) // = ‘0’
So we can see that all the tokens were correctly assigned to our initial account.
The first transaction that we’ll be doing is transfering some tokens to the second account, acc1, three times.
To do so for the first transaction
truffle(rsk)> cfToken.transfer(acc1, web3.toWei(88.8), {from: acc0})
0xd45437b777f1430e7cec57bd80b261ce8f87bf8a3f9a113fecd20563403c4d9c
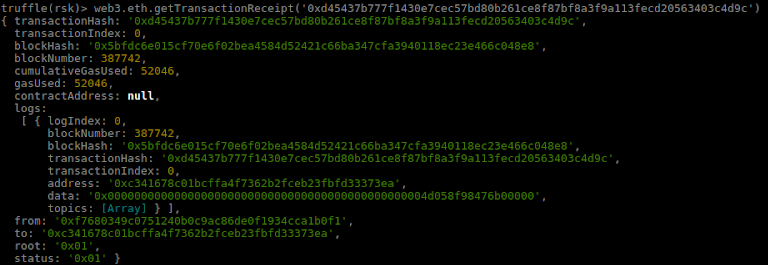
truffle(rsk)> web3.fromWei(cfToken.balanceOf(acc0).toString(10)) // = '733.6'
truffle(rsk)> web3.fromWei(cfToken.balanceOf(acc1).toString(10)) // = '266.4'

We see that tokens taken from our deployment account were the same amount as the ones received in the acc1.
With the StandardToken contract we also get allowances permissions to spend tokens on behalf of a certain account, in this case, acc1. If we want to do this before getting the approval, the transaction will fail (status ‘0x00’)
truffle(rsk)> cfToken.transferFrom(acc1, acc0, web3.toWei(5), {from: acc0})
0x5cee7cf60849283a0088d71483a606ba2101b500e13f972abada4f75781596bf
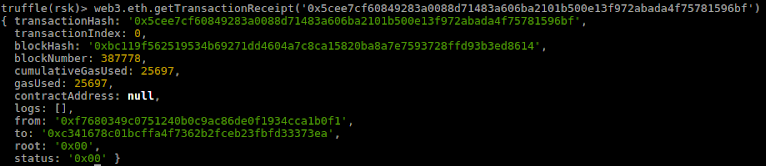
After checking that acc0 is not allowed to send from acc1
truffle(rsk)> web3.fromWei(cfToken.allowance(acc1, acc0, {from: acc0}).toString(10)) // = '0'
We authorize acc0 to spend 10 tokens in the name of acc1, from a transaction made by acc1
truffle(rsk)> cfToken.approve(acc0, web3.toWei(10), {from: acc1})
0x6e1a202f4ca7f43dfb28034952d54a572993b986a55857790aa51854afbc1fb4
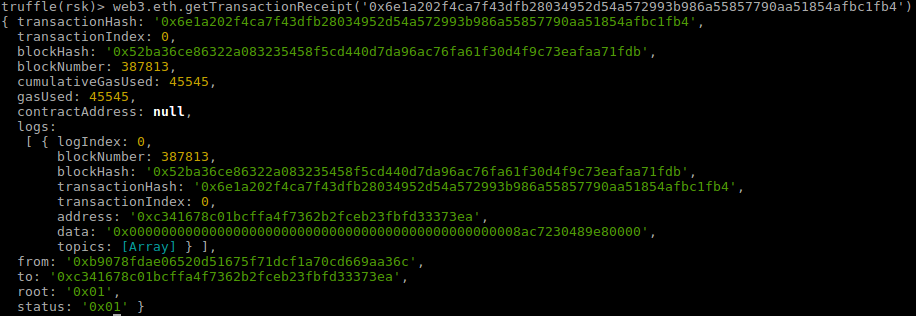
In the output log, we see that the function was completed successfully with true and the log shows the amount allowed to acc0 for spending. Checking with allowance
truffle(rsk)> web3.fromWei(cfToken.allowance(acc1, acc0, {from: acc0}).toString(10)) // = '10'
![]()
Now if we execute again the spending transaction
truffle(rsk)> cfToken.transferFrom(acc1, acc0, web3.toWei(5), {from: acc0})
0x41f750eabb6e0d3ab576aac0333b0d337ca61808aae1eeafa9d8e2a0b81b979b
we get a successful transaction with status ‘0x01’.
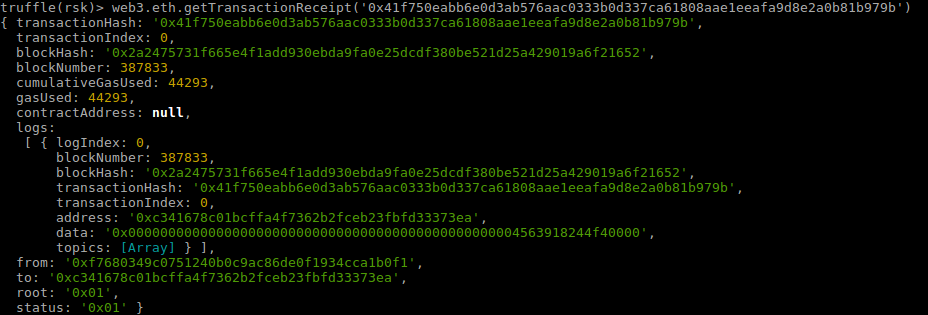
Checking the balances again
truffle(rsk)> web3.fromWei(cfToken.balanceOf(acc0).toString(10)) // = '738.6'
truffle(rsk)> web3.fromWei(cfToken.balanceOf(acc1).toString(10)) // = '261.4'

Lastly, if we sign a transaction calling a function that’s not available, our fallback function will be called. Signing a transaction like
truffle(rsk)> web3.eth.sendTransaction({from: acc0, to: cfToken.address})
0x4106a287fc60669bf9682a73ec4c457b094c086ec7408a5dea95d200688c4ee9
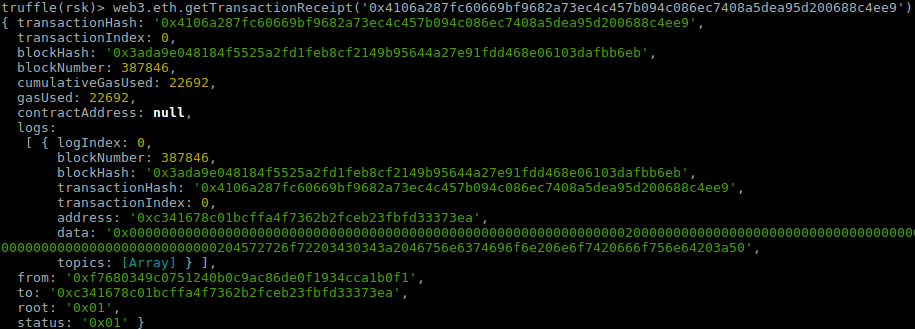
Will return us a log whose data represents the string “Error 404: Function not found :P” in hex
(‘0x00…00204572726f72203430343a2046756e6374696f6e206e6f7420666f756e64203a50’).
Our last function, that we are not going to execute for obvious reasons, is the suicide function. We need the contract not to be destroyed in order to show the transactions. To call it, the owner should do
truffle(rsk)> cfToken.destroy({from: acc0})
Conclusions
In this second part of the walkthrough I’ve shown an example for developing a simple smart contract in the RSK network. We’ve seen how to
- Import libraries and contracts from the OpenZeppelin suite,
- Create a simple Token using these libraries,
- Configure the migration process for Truffle,
- Deploy our contract to the RSK Main network,
- Interact with the contract through different accounts,
- Check the block’s log to get feedback on the transactions.
As we have seen, the usage of an RSK network for Solidity Smart Contracts deployment and interaction is practically the same as in an Ethereum node. Of course, this is still a beta network and issues and bugs are expected, mainly in the node, but the RSK Labs team is doing a great job to solve them as fast as they can when they appear. With time, robustness will be achieved.
Stay tuned for the next article, where I’ll talk about deployment and interaction with Web3.py.

Permalink
Permalink
Permalink
Permalink
Permalink
Permalink
Permalink
Permalink
Permalink
Permalink