


Motivation
In my last article, I’ve shown you how to write a Solidity ERC20 Token for the RSK Mainnet, how to import and use OpenZeppelin libraries and contracts, and how to use Truffle to deploy and interact with our contract.
Although we succeeded in our quest and accomplished our objectives using Truffle, eventually this suite might present failures when you are sending transactions, deploying or managing accounts. In our case, while following the previous article instructions, I’ve had problems managing newly created accounts in Truffle and sending transactions.
The first problem that I had was the freezing of part of the funds in SBTC that the RSK Labs Team gave me to test the Mainnet (thanks to Maximiliano). Although I’d unlocked the account, the node asked me anyway for the private key of the account created with (as we have seen in the first article):
truffle(rsk)> web3.personal.newAccount(‘somePassword’)
truffle(rsk)> web3.personal.unlockAccount(web3.eth.accounts[0],'somePassword')
For that reason, and for the safety of the few SBTC that I had left, I added the suicide function to the contract in case something went wrong while doing the article.
The second problem appeared when I tried to interact with the already deployed contract. While sending a transaction, Truffle sends the body of it to the node with the data and the rest of the parameters (as I watched live in the rsk.log file). However, after twenty minutes the transaction was never included in any block and neither the receipt, nor its hash, were known to the node.
The way I worked around this was to configure the cors parameter in the node.conf file to allow Metamask to connect to the node. Then, the transaction was sent by encoding the function in question and its parameters to a hex string and entered in the data field. After sending it with the same nonce value as the transaction sent with Truffle, it was finally included.
Don’t get me wrong, the Truffle suite is a great tool for developers, but if you can’t live with some problems every now and then while developing smart contracts, stay focused and continue reading.
The tool that I’ll be discussing here is the Python version of Web3: Web3.py.
Introduction
Since rskj behaves just like an Ethereum node (i.e. it exposes the same JSON-RPC API), we can use other implementations to interact with it. The most popular version of Web3 is the one written in JavaScript (Web3.js). But since November, there has been a higher rate of updates in the Web3.py project, improving its usability dramatically. This version also allows a more friendly interaction experience than Web3.js.
In this article we’ll be discussing deployment and interaction of the same ERC20 Token contract used in the last article, to compare the usability with both tools.
Since rskj 4.2, the RSK Testnet is back online. For that reason, and because we couldn’t use it before, we are going to deploy and test our contracts on that network for this article.
Changing to Python
Web3.py is written in Python3. If you’ve never used Python before, you probably need some packages. Otherwise, when we install Web3.py in our environment, we will have errors during the compilation. We install them with:
$ sudo apt-get install gcc
$ sudo apt-get install python3-dev
Setting up the environment
We want to keep separate the instance of Web3.py from the rest of our personal Python modules. To do so, we need to create a virtual environment of Python with:
$ sudo apt install virtualenv
$ virtualenv -p python3 ~/web3_py
Then, we activate the instance with:
$ source web3_py/bin/activate
In the terminal, we should be able to see the command prompt as:
(web3_py) user@computer:~$
That means that our virtual environment for Python is now active. Now, we will install the libraries of the project with:
(web3_py) user@computer:~$ pip install web3
You shouldn’t have any errors.
To improve the interpreter’s appearance, I recommend to install IPython (no, not from the App Store) with:
(web3_py) user@computer:~$ pip install ipython
If we want to have a break and exit the virtual environment, we can do so with:
(web3_py) user@computer:~$ deactivate
We are going to use the Test network to deploy our contracts, so feel free to check again the first article in which we’ve discussed how to change networks (and change it yourself! ; ) ).
Now, we have a suitable environment to start our scripts.
Installing SOLC
It’s not Python‘s job to compile our .sol (Solidity contract code). That’s an assignment for our Solidity compiler: Solc. To install the latest stable version of it, we do it with:
$ sudo add-apt-repository ppa:ethereum/ethereum
$ sudo apt-get update
$ sudo apt-get install solc
With that, we should be able to compile our contracts like this:
$ solc <contract>.sol --bin --abi --optimize -o <output-dir>/
where <contract>.sol is the Solidity code file and <output-dir> is where our built ABIs and bytecodes files will be.
Startup Setup
Once we open Python from our virtual environment, we need to import libraries such as Web3 and Json, but before that, there is an issue that must be taken care of. In some cases, even with Python3, the autocomplete with double TAB does not work. To solve this, you need to import some libraries doing the following:
>>> try:
...    import readline
... except ImportError:
...    print("Module readline not available.")
... else:
...    import rlcompleter
...    readline.parse_and_bind("tab: complete")
After that, we should have this feature activated. Now, to import the rest of the libraries, we just simply do:
>>> from web3 import Web3
>>> import json
Then we are ready to connect Python to our node, which you’ve already run, I presume. Otherwise, we start it with:
$ sudo service rsk start
The connection object is instanced in the following way:
>>> web3 = Web3(Web3.HTTPProvider("http://MACHINE:PORT"))
where MACHINE and PORT are the IP, or name, and port that we’ve assigned in the node.conf file. By default, it’s localhost:4444.
To test if everything worked successfully, we check the block number in the Python interpreter like this:
>>> web3.eth.blockNumber
Now, we proceed to deploy the contract.
Deployment of the ERC20 Token with Web3.py
We are going to deploy the ERC20 Token contract based on the OpenZeppelin libraries. To be consistent with my previous articles I rename the two accounts as before, typing:
>>> acc0 = web3.eth.accounts[0]
>>> acc1 = web3.eth.accounts[1]
In another terminal, we go to the folder where the contract code is, and then we compile it using Solc like this:
$ solc CoinFabrikToken.sol --bin --abi --optimize -o Compiled/
Inside the Compiled folder we find not only the ABI and bytecode of our contract, but also its compiled dependencies. Nevertheless, we only need the ones from the main contract.
To import both files into the Python VM, we can do it like this:
>>> with open("./Compiled/CoinFabrikToken.abi") as contract_abi_file:
...   contract_abi = json.load(contract_abi_file)
>>> with open("./Compiled/CoinFabrikToken.bin") as contract_bin_file:
...   contract_bytecode = '0x' + contract_bin_file.read()
Then, we can create the instance of the contract, giving it the ABI and the bytecode with:
>>> cfToken = web3.eth.contract(abi=contract_abi, bytecode=contract_bytecode)
And after that, we create (and deploy!) the contract typing:
>>> tx_hash = cfToken.constructor().transact(transaction=tx_args0)
We save the hash of the transaction for two reasons: to check the status, address and more parameters, and because we can use it with the function waitForTransactionReceipt to know when the contract is mined.
To calculate the address in which the contract will be deployed, we need the address used for deploying the contract, acc0, and the nonce of the transaction. We have both things, so we import a couple of libraries and then we call the function as following (thanks to M. Stolarz for this finding):
>>> import rlp
>>> from eth_utils import keccak, to_checksum_address

>>> contract_address = to_checksum_address('0x' + keccak(rlp.encode([bytes(bytearray.fromhex(acc0[2:])), web3.eth.getTransaction(tx_hash).nonce]))[-20:].hex())
The address is set in our instance like this:
>>> cfToken = web3.eth.contract(address = contract_address, abi = contract_abi, bytecode = contract_bytecode)
After that, our contract will be written into the blockchain.
One of the faculties of Python is that we can make a script of all the commands and then execute them all together like this:
>>> exec(open("deploy_cfToken.py").read())
This means that we can deploy the contract in one line like with Truffle (but knowing what it does! =D ).
Our deployed Token contract of the Test network is now at 0x7C0c436e1E8dCd270a7A306B5AE8A2996f6A25dD .

Interaction with the contract
After we’ve deployed the Token, the instance should be already created to call it easily. To call a function in which the blockchain is not modified, such as a getter, we do:
>>> cfToken.functions.FUNC_CALL().call()
Where FUNC_CALL is a callable function of the contract that doesn’t modify the blockchain.
If we want to modify the blockchain (to set a value, to do a calculation, etc), the proper syntax is:
>>> cfToken.functions.FUNC_SET(PARAMETERS).transact(TXARG)
Where FUNC_SET is a function of the contract that modifies the blockchain, PARAMETERS are the values that the function takes and TXARG are the arguments for the transaction written like:
>>> txargs0 = {“from”: acc0 , “gasPrice”: 0, “gas”: 3000000}
We can check that the variable for our name is empty with:
>>> cfToken.functions.getON().call() // ‘’
![]()
So, as before, if we try to modify the variable without being the owner, acc1, the transaction is unsuccessful.
>>> cfToken.functions.setON('Andrés Bachfischer').transact(txargs1)

[Hint: if you get an Internal Server error, your account is probably locked up again. It has a timeout.]
So, if we send the same transaction from acc0 instead of acc1, we obtain:
>>> cfToken.functions.setON('Andrés Bachfischer').transact(txargs0)
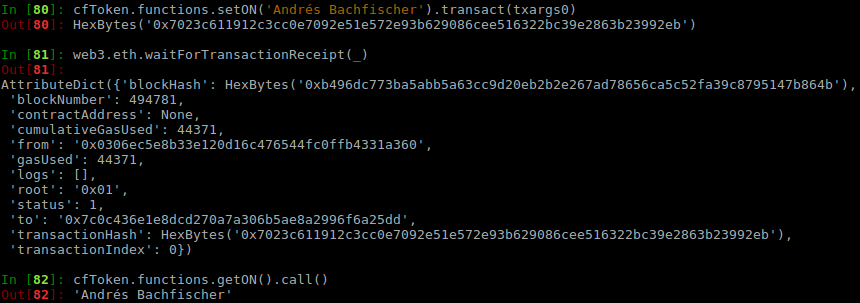
We see that the status gives us a successful operation.
Now we will focus on the Token’s functions, we check the original balances of our accounts typing:
>>> web3.fromWei(cfToken.functions.balanceOf(acc0).call(),'ether') // = 1000
>>> web3.fromWei(cfToken.functions.balanceOf(acc1).call(),'ether') // = 0

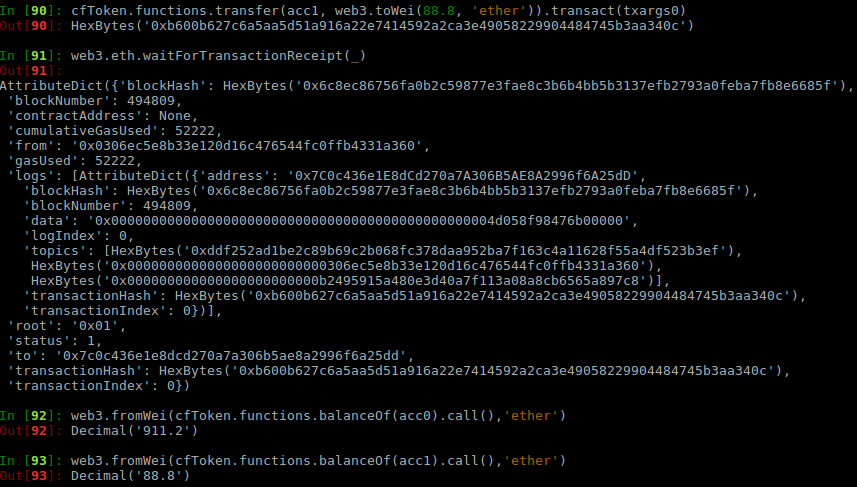
Now, we make a transfer from the owner account to our second account by executing:
>>> cfToken.functions.transfer(acc1, web3.toWei(88.8, 'ether')).transact(txargs0)
And we get the new balances:
>>> web3.fromWei(cfToken.functions.balanceOf(acc0).call(),'ether') // = 911.2
>>> web3.fromWei(cfToken.functions.balanceOf(acc1).call(),'ether') // = 88.8
Moving on to next function, we check that acc0 doesn’t have the allowance on behalf of acc1
>>> web3.fromWei(cfToken.functions.allowance(acc1, acc0).call(txargs0),'ether') // = 0
![]()
So, to grant a limit of 10 Tokens to acc0 from acc1, you have to do it with:
>>> cfToken.functions.approve(acc0, web3.toWei(10,'ether')).transact(txargs1)
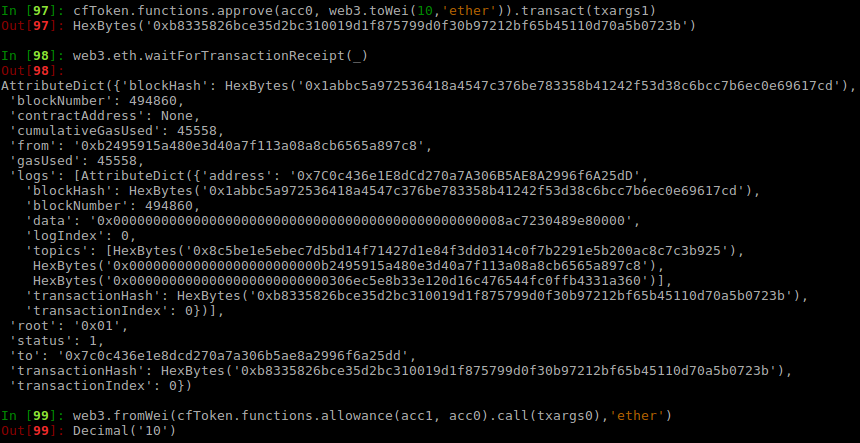
Let’s spend on behalf of acc1:
>>> cfToken.functions.transferFrom(acc1, acc0, web3.toWei(5,'ether')).transact(txargs0)
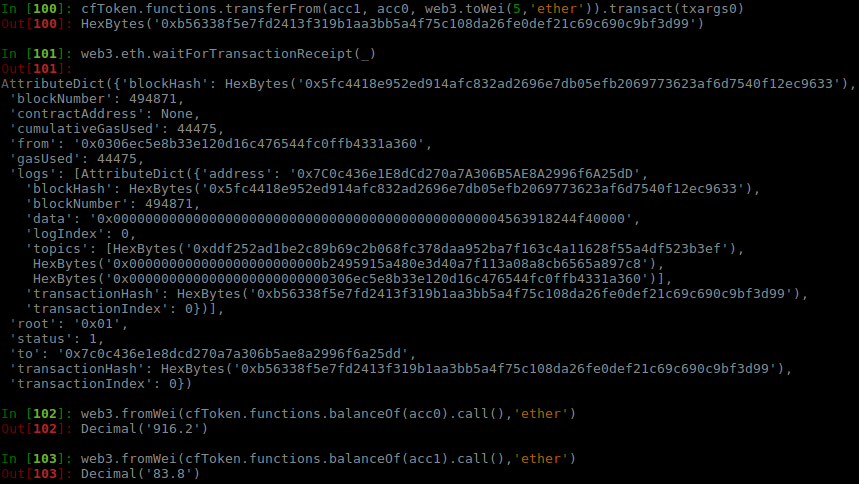
We see that the transaction was successful, as expected.
Finally, we send a transaction to the contract without calling any function, which will active the fallback function (default behaviour):
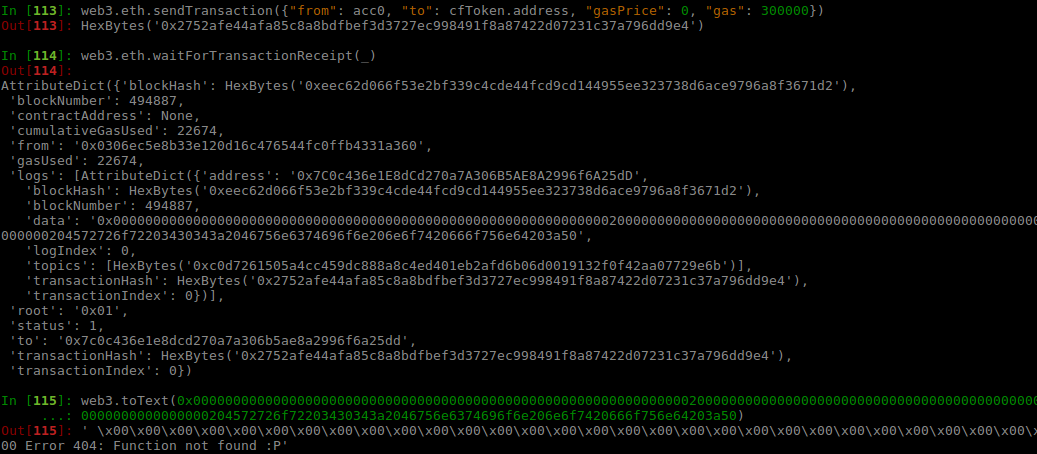
This will warn us that we did something wrong or that the function doesn’t exist.
Conclusions
To add to the previous article achievements, in this tutorial we have learn how to:
- Set up a proper developer virtual environment,
- Install the Solc compiler,
- Compile our contracts with Solc,
- Install and configure Python packages,
- Connect Python to our node,
- Deploy the compiled contract to the Test network using Python,
- Interact with the contract using Python,
- Write automatic Python scripts to load the compiled contract and deploy.
We saw that the syntax of both tools are alike. Truffle is easier to use from scratch because putting the contract code in Solidity is enough to make it deployable from the suite. With two simple commands, your Smart Contract is ready to go. But because we had issues using the Truffle suite when we sent transactions, a change was needed.
The Web3.py implementation is way better for a developer at the time of writing. Not only did it retrieve the funds from a stuck account made in Truffle, but also has a newer version of Web3 and allows non-trivial scripts to be executed. Operations in Truffle may sometimes be more complex than necessary. Yes, maybe you need to set up more packages and libraries from the start, not taking into account that you need to compile the code yourself, but in the long run it seemed to me that this tool was more stable than Truffle to develop contracts.

Permalink
Permalink
Permalink
Permalink
Permalink
Permalink
Permalink
Permalink
Permalink