


The Bitcoin community has been talking about multi-signature wallets for years. However, it is still very difficult for end users to use these wallets. Multi-signature wallets should allow copayers to communicate, but there is no standard protocol for seamless communication between copayers. The Bitcoin community should standardize the communication process.
We’re going to learn to use a 2-of-3 multisignature wallet with Coinkite’s API and Bitcore. One cosigner will use a Coinkite account, and the other will use the Bitcore library in NodeJS.
Setting Up Your Coinkite Multi-Signature Wallet
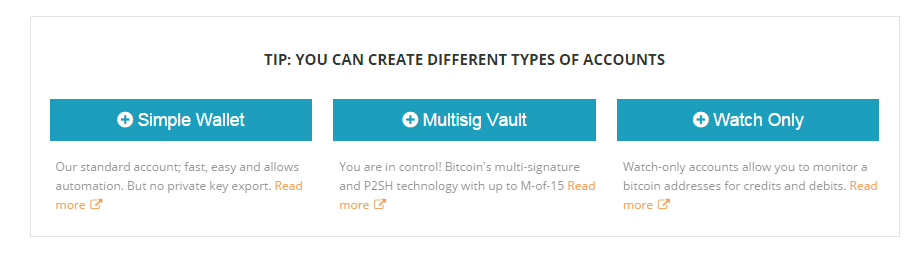
First we need to create a multi-signature wallet on Coinkite. Select “Multisig vault” on the Coinkite wallet page.
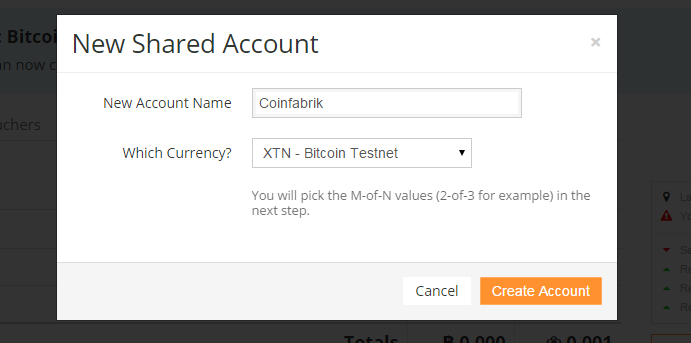
Enter an account name and select “Bitcoin Testnet” as currency.
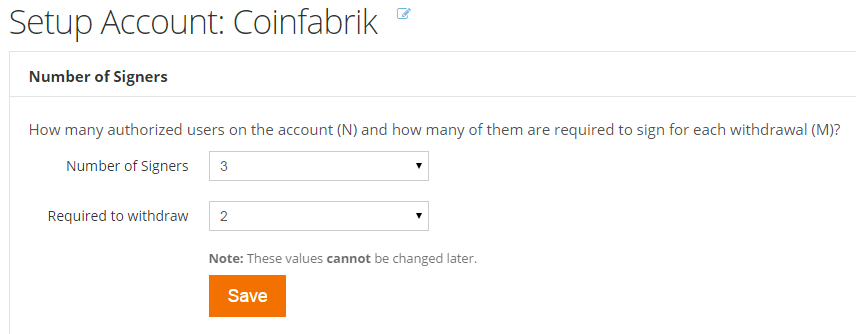
Choose 2-of-3 (the default value).
Now it’s time to configure each cosigner. For the first cosigner, select “Simple”. This cosigner will be controlled by Coinkite, so we name it “Coinkite”.
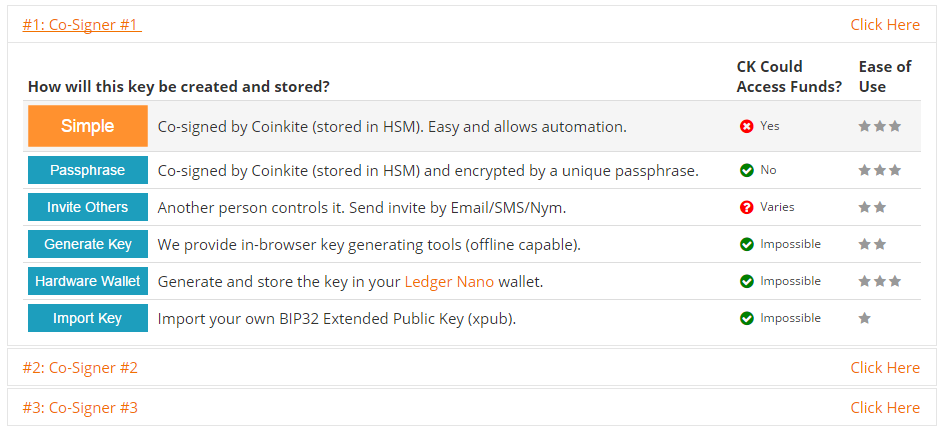
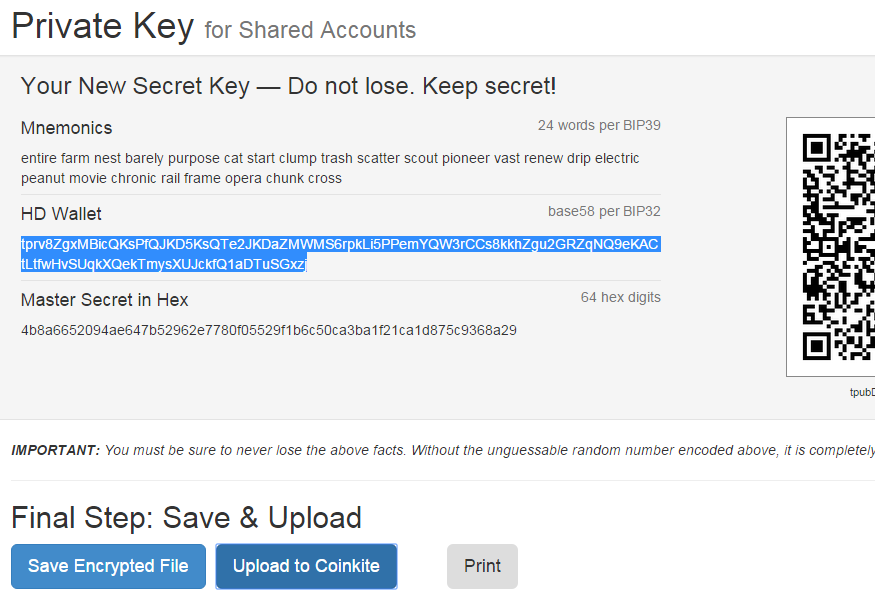
For the second cosigner, select “Generate Key”. Go through the process until you see the screen below. Securely store the “HD Wallet” part. Next, click “Upload to Coinkite”.
Rename the second cosigner “Bitcore”.
Each of the three cosigners in a 2-of-3 wallet has a private key, however, since two cosigners are sufficient, we will use the third cosigner’s key as a backup. Choose “Passphrase” or “Generate key” and name the third cosigner “Backup”.
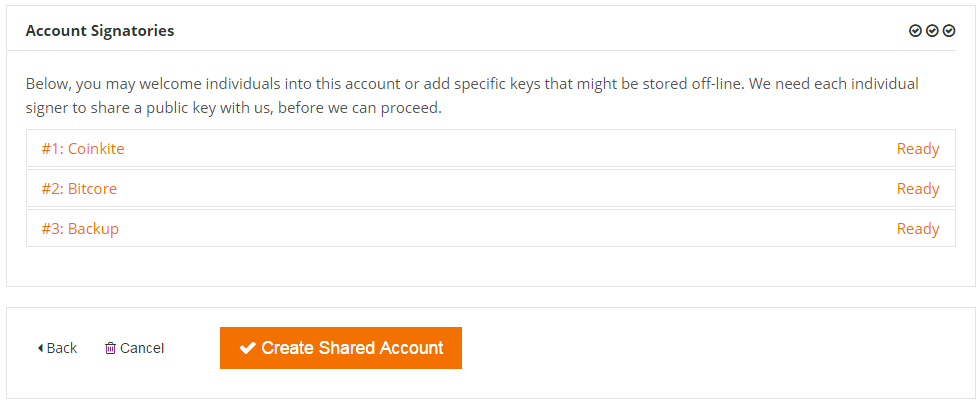
Click “Create Shared Account”, accept the warning, and your multisig wallet should be ready.
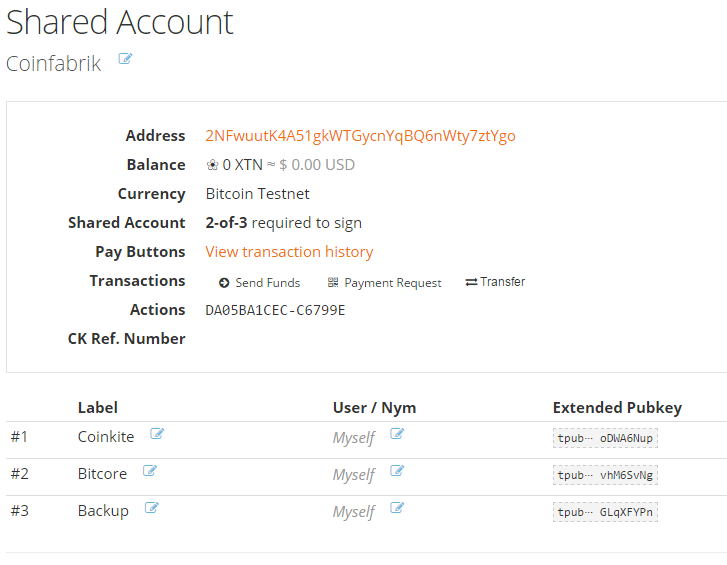
The above window shows your balance, your receiving address, and the public keys for each cosigner. Save this page to your bookmarks as it might come in handy later.
API keys
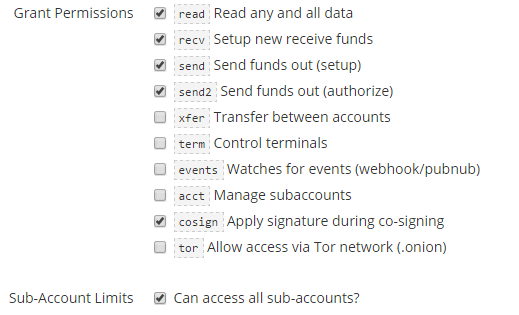
We need Coinkite’s API keys. Go to https://coinkite.com/merchant/api and click “Create New Key”. On the next screen, check the following permissions: read, recv, send, send2, and cosign. Click “Save Changes”.
You’ll be given an API key and an API secret. Write down the API secret as it’s only shown for a limited time.
Enter NodeJS
So, we’re all set up on Coinkite’s side. We’ll create an empty node project (you need to have NodeJS installed). We need three packages: bitcore, coinkite-javascript and request. In an empty folder, run the command:
npm install bitcore coinkite-javascript request
This will install both of them: request is a widely used package that’s for, you guessed it, making http requests. We will use it to communicate with Coinkite’s API. coinkite-javascript is written by the Coinkite team, and will help us to set the correct headers when making those requests.
The First API Call
To make your first API call, create the file “app.js” containing the code below in your project folder. Don’t forget to enter your own API keys.
//app.js
var CK_API = require('coinkite-javascript/coinkite-api.js'),
   request = require('request'),
   apiKeys = {
       KEY: 'your api key',
       SECRET: 'your api key secret'
   };

request({
   url: 'https://api.coinkite.com/v1/my/self',
   headers: CK_API.auth_headers(apiKeys.KEY, apiKeys.SECRET, '/v1/my/self'),
   method: 'GET',
   json: true
}, function(error, response, body) {
   if (response && response.statusCode == 200) {
       console.log('My user name is ' + body.username);
   }
});
Here we’re using the request package to call https://api.coinkite.com/v1/my/self , which is a Coinkite API endpoint, to get general information about your account (view documentation).
We’re using Coinkite’s helper to place the correct authentication headers. When the json option is set to true, the response body is automatically parsed for us.
If you run this node app.js you should get the following response:
My user name is <your username>
The following helper code will allow us to call any Coinkite endpoint and automatically set the correct header. Create a file in the same project folder called “coinkite-helper.js”.
//coinkite-helper.js

var CK_API = require('coinkite-javascript/coinkite-api.js'),

  request = require('request'),

  apiKeys = {

      KEY: 'your api key',

      SECRET: 'your api key secret'

  };

exports.request = function makeRequest(endPoint, method, params, cb) {

  request({

      url: 'https://api.coinkite.com' + endPoint,

      headers: CK_API.auth_headers(apiKeys.KEY, apiKeys.SECRET, endPoint),

      method: method,

      json: params || true

  }, function(error, response, body) {

      if (error) {

          return cb(error);

      }

      if (response && response.statusCode !== 200) {

          return cb(new Error(response.statusCode + ': ' + JSON.stringify(body)));

      }

      cb(null, response, body);

  });

};
The request function can now be used for any Coinkite endpoint, any HTTP method, and parameters.
Now let’s replace the contents of app.js so it uses this helper function:
//app.js

var ck = require('./coinkite-helper');


ck.request('/v1/my/self', 'GET', {}, function(error, response, body){

  if (error) throw error;

  console.log('My user name is ' + body.username);

});
If you run the app again, you should get the same result as before.
Cosigning Process
The Coinkite API endpoints we will be using are /v1/new/send and /v1/co-sign (link to this cosigning related ones).
The process of performing a transaction with a 2-of-3 multi-signature wallet on Coinkite is as follows:
- Make a send request (using /new/send). You will get tha “CK_refnum” to identify the send request. You can use the detail endpoint with any CK_refnum to see all the information about that object, which could be anything (requests, accounts, cosigners…).
- Get the signing requirements for the cosigner we have named bitcore by using /co-sign/<request_refnum>/<cosigner_refnum>.
- Ask Coinkite to sign the transaction.
- Sign for the “bitcore” user and send the signature via /co-sign/<request_refnum>/<cosigner_refnum>/sign.
Now we will guide you through the code for each of these three steps.
To begin, we need the cosigners refnums. To get them, modify app.js as follows:
//app.js

var ck = require('./coinkite-helper');


ck.request('/v1/account/Coinfabrik', 'GET', {}, function(error, response, body){

  if (error) throw error;

  var cosigners = body.account.cosigners.map(function(c) {

      return {

          user: c.user_label,

          refnum: c.CK_refnum,

          xpubkey: c.xpubkey

      };

  });

  console.log(JSON.stringify(cosigners));

});
Run the script and you should get something like this:
[{“user”:”coinkite”,”refnum”:”1EC3A1CFFE-2DAE34″,”xpubkey”:”tpub⋯ rumgqaM9″},
{“user”:”bitcore”,”refnum”:”1B590633FF-3B60BC”,”xpubkey”:”tpub⋯ ANz6KXnh”}]
Assign this, and list the HD private key we generated at the beginning of app.js to use later:
//app.js

var ck = require('./coinkite-helper'),

   cosigners = [{"user":"coinkite","refnum":"1EC3A1CFFE-2DAE34","xpubkey":"tpub⋯ rumgqaM9"},

  {"user":"bitcore","refnum":"1B590633FF-3B60BC","xpubkey":"tpub⋯ ANz6KXnh"}],

   xprivKey = 'put the hd priv key we generated with Coinkite offline tool here';
The “bitcore” user’s xpubkey and xprivkey should be the ones we generated earlier.
Issuing Send Requests
The API endpoint for creating send requests is /v1/new/send. The Coinkite API requires that we use the PUT method and the parameters account, amount, and destination:
In order to try this, your wallet must contain bitcoins. Here’s a faucet that you can use to obtain free testnet bitcoins.
function newSendRequest(amount, destination) {

  ck.request('/v1/new/send', 'PUT', {

      account: 'Coinfabrik',

      amount: amount,

      dest: destination

  }, function(error, response, body) {

      if (error) throw error;

      console.log('Request refnum: ' + body.result.CK_refnum);

  );

}


newSendRequest(0.001, '2NFFS15hQTJAf6RpoTwchfZZWBigitXgfrM');
If you try this more than once you might get the error “No fund sources to draw from (no balance)”. This is because the rest of the funds are being sent to the change address. If this happens, go to the “Pending and Recent Transactions” section at the bottom of https://coinkite.com/accounts/balances to cancel pending requests. The API can also be used to cancel Coinkite requests:
function cancelRequest(requestRefnum) {

  ck.request('/v1/update/' + requestRefnum + '/cancel_send', 'PUT', {}, function(error, response, body) {

      if (error) throw error;

      console.log('Request canceled.');

  });

}
To resume a previous transaction, use the endpoint /v1/list/unauth_sends.
Signatures
Now for the fun part (signing stuff is fun, right?). We will sign the transaction with the Coinkite API and then add another signature with Bitcore.
The first part is pretty straightforward. We can ask Coinkite to sign using the co-sign endpoint. Here we’re using the “cosigners” variable that we defined earlier, which has all the cosigners’ refnums:
function askCoinkiteSignature(requestRefnum) {

  ck.request('/v1/co-sign/' + requestRefnum + '/' + cosigners[0].refnum + '/sign', 'PUT', {},

      function(error, response, body) {

          if(error) throw error;

          console.log(JSON.stringify(body));

      });

}
You should get the message “Signature added, but further signatures are required.”, along with data related to the transaction at hand.
We will use the “Bitcore” cosigner’s CK_refnum for the other signature. Fetch the signing requirements, sign them, and send the signatures back to Coinkite.
function signWithBitcore(requestRefnum, callback) {

  ck.request('/v1/co-sign/' + requestRefnum + '/' + cosigners[1].refnum, 'GET', {}, function(error, response, body) {

      if (error) throw error;

      ck.request('/v1/co-sign/' + requestRefnum + '/' + cosigners[1].refnum + '/sign', 'PUT', {

              signatures: getSignatures(body.signing_info)

          }, callback);

  });

};
First we request the signing requirements for the “Bitcore” cosigner, then we send the corresponding signatures.
getSignatures
This is the getSignatures function we used above:
var bitcore = require('bitcore'),

  assert = require('assert');


function getSignatures(signingInfo) {

  return signingInfo.input_info.map(function(input, index) {

      var sighash = signingInfo.inputs[index][1],

          pathIndex = input.sp,

          address = signingInfo.req_keys[pathIndex][0],

          privateKey = new bitcore.HDPrivateKey(xprivKey, bitcore.Networks.testnet)

              .derive(input.full_sp)

              .privateKey;

      assert(signingInfo.inputs[index][0] == pathIndex);

      assert(privateKey.toAddress().toString() == address);

      return [

          getSignature(privateKey, sighash),

          sighash,

          pathIndex

      ]

  });

}


function getSignature(bitcorePrivateKey, sighash) {

  var b = new Buffer(sighash, 'hex');

  var sig = bitcore.crypto.ECDSA.sign(b, bitcorePrivateKey).set({nhashtype: 1});

  return sig.toString('hex') + '01';//01 = SIGHASH_ALL

}
There’s a lot going on here so let’s break it down. We need a signature for each input we are sending money from. Coinkite provides all the information we need to generate these signatures except the extended private keys we already have. The full signingInfo structure, available here, provides the following information:
-
- sighash: This is what we sign.
-
- pathIndex: This is the x value in Coinkite’s m/x derivation path. We use the pathIndex to derive a regular private key from an HD key.
- address: The input address.We can use the input address to ensure that we generated the correct private key.
We will also need to generate a private key (privKey) for each input. We use Bitcore, our xprivKey and the derivation path provided by Coinkite to do this.
With this private key in hand, we sign the sighash using the bitcore.crypto.ECDSA.sign function. We then assemble a triplet for each input with the corresponding signature, sighash and path index and send it to Coinkite.
Tying It All Together
See our sample code for an example of how to link all of these functions together to perform a transaction from start to finish.
Bonus: How to Generate Addresses for HD Multi-Signature Wallets
Hierarchical Deterministic (HD) wallets generate a new address for each transaction. The only difference in this case is that each of those addresses is multi-signature. A 2-of-3 wallet is associated with three public keys.
To generate each multisig address Coinkite derives regular public keys from the cosigner extended public keys and creates a new multisig address for them:
function getDepositAddress(hdPublicKeys, index, requiredSignatures){

  var derivedPublicKeys = hdPublicKeys.map(function(pubString){

      return (new bitcore.HDPublicKey(pubString))

          .derive('m/' + index)

          .publicKey;

  });

  return new bitcore.Address(derivedPublicKeys, requiredSignatures);

};